Showing posts with label tutorial. Show all posts

Friday, July 8, 2011

Yellow silk Tie

Oh boy.  I'm not sure if I have done it right, but I've just created my first pattern and put it onto Burdastyle as a free downloadable pattern!
So OK, it's just for a tie (baby steps, here), but it still took me ... er, hours.  Actually far far longer to draw and write up the darn pattern than to make up the tie...!  If you want, you can get my pattern here   (Later edit: you have to click on "print pattern at home" to get the instructions, which form part of the pdf...)


So, during the month of June we had Tim's birthday party, and he asked me if I could make him a tie to wear.  Tim has very firm ideas on his apparel, and always has to look sharp.  Hmmm, where did he get that one from, I wonder...
He had his heart set on a definite colour, and since I had mentioned oh-so casually once upon a time how a tie would be laughably easy to make, and a darn sight cheaper to make your own than the $60 odd you get charged for RTW, even polyester, he put in his request.
So, I have taken apart one or two ties in my time (the last time to make this), and they are pretty easy to make, but I took a few progress shots to show here, so if you haven't made one before you don't have to take apart your own tie natch, to find out... 
Firstly, a tie has four different fabric components, the outer fashion fabric, lining fabric, padding fabric, and a section of very lightweight underlining fabric.
I used:
For the fashion fabric the lovely rich egg-yolk yellow silk dupion Tim had chosen
scraps of lightweight turquoise cotton for the lining
A strip of corduroy for the padding
scrap of organza for the underlining

The underlining is pinned in place onto the wrong side of the tie, this is presumably to avoid stitching lines appearing on the outside of the tie.
To get the nice mitred top and bottom edges of the tie, which is a nice finish ensuring that the lining fabric will not peep out from around the edges of your finished tie; I sewed the triangular lining pieces on as follows...
Firstly, fold the tie lengthwise in half, and sew a short line of stitching, perpendicular to the centre fold of the tie... starting at the centre fold and finishing at about 5mm from the raw edges.   The pin is laid in place alongside the white stitching line.
Note: this is a demo scrap that I sewed up later to show up that stitching line properly, really your underlining fabric should be in place wrapped around on the outside of this fold.  I did take a photo with the underlining in place, but my white thread didn't show up very well against the white underlining fabric, so took these mock-up photos separately, without the underlining.
Lay the triangular lining piece over and stitch to the fashion fabric, each line of stitching ending right at the end of your short stitching line, that you did in the previous step.
Turn out, and you have a nice mitred corner.  Do both the top and bottom of the tie in the same way...
Now insert the padding into the points of the tie.  This requires some gentle stuffing and poking the padding point up cleanly and firmly into the corner; I know there are proper tools for this job that proper seamsters use but I usually use a slightly blunted pencil (hehe, oops!) I had cut my padding a tad long, just in case, and so there was some trimming required here to get it all sitting in nice and flat.
Then just fold one long edge in and press firmly in place the length of the tie.
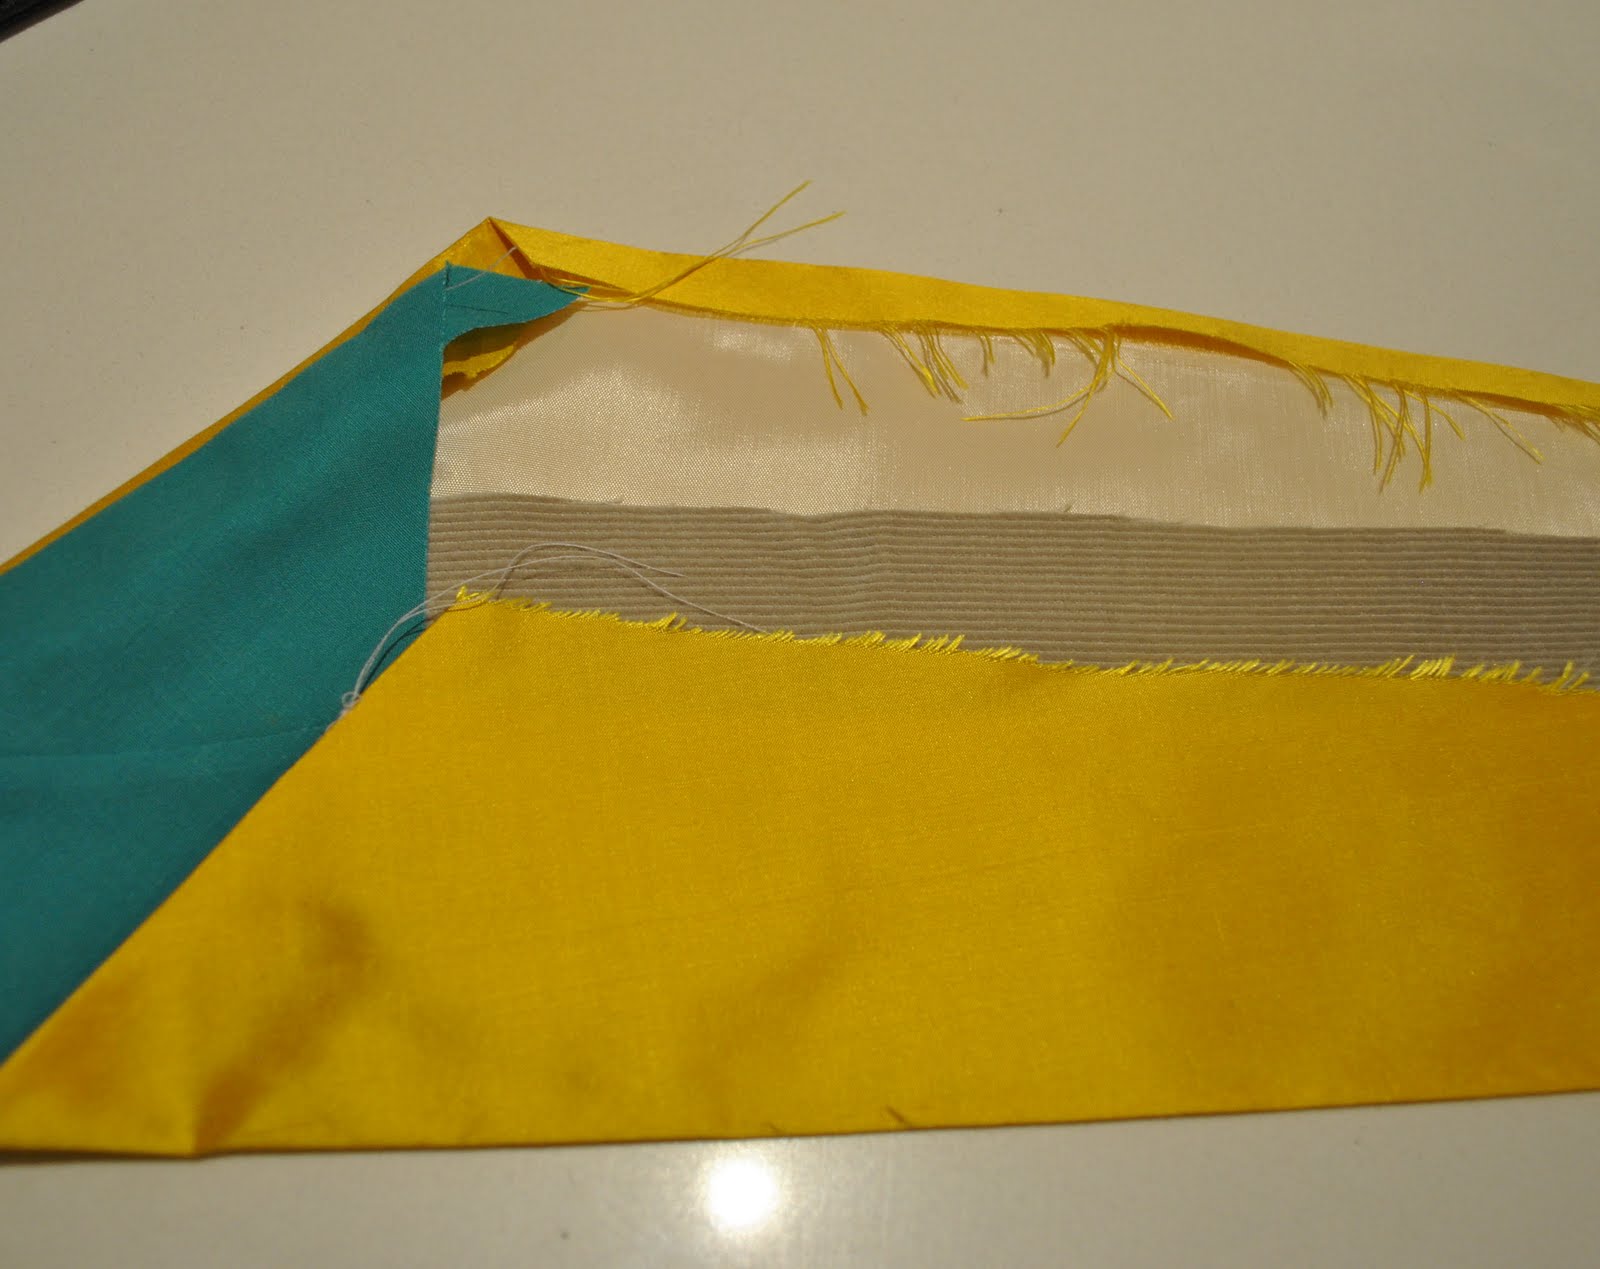
The last open edge, fold in the seam allowance, then fold over the centre of the tie and press.
Slip stitch that long folded edge in place, and down those short slanted edges onto the lining.
Voila!

Sunday, June 12, 2011

A cool pocket

I've just put these pockets on a shirt/jacket I've made for Sam for his birthday, and I'm super pleased with how they turned out.  So wanted to share them.
I kind of got the idea from similar pocket I saw on a young mens' leather jacket in the surf shop.   Seriously, the surf shop is a gold mine for wonderful ideas!  They somehow take hideous fabrics and unpromising shapes, and manage to make cool stuff that teenagers just love...
I'm pretty thrilled with these pockets, because they are a double pocket, like two pockets in one.  One is a welt pocket, and the other is a patch pocket, but both are part of the same pocket!
The shirt/jacket is of corduroy, a thin, non-stretchy navy blue corduroy, a colour that really suits him.  (yes, because I used corduroy I spent the entire process obsessively stroking all the fabric pieces to make sure they were all facing with the nap the right way at every step!!)  The contrasting lining fabric is a thin beige cotton that has a subtle tiny plaid woven into it.
Firstly I took a rough measurement of my son's handspan, and cut out two pocket pieces, and welt pieces.  For the lining of the pocket cut two each of pieces of the fashion fabric and of the lining fabric, which will be joined together; the fashion fabric section to go under the welt, so that when he has his hands in his pocket the inside looks just like the rest of the jacket, but the main of the lining to be of a thin contrasting cotton so as not to add too much bulk to the pocket (this is illustrated in the next step).  Also cut and construct two pocket flaps, mine have slightly curved lower edges.
Join the two pocket lining fabrics together, and iron the welt flaps in half along their long side.
On your fashion fabric pocket piece, mark where the welts are going to sit with pins.  The welts will sit vertically at the outside edges of the pockets, so the wearer can shove their hands inside easily.
Pin the unfolded edges of the welt so that the stitching line sits on the inner line (in the picture, the stitching line of the pocket welt on the right is marked with a white thread).  Stitch.
Now, lay the edge of the pocket lining, pieced together in the third picture above, so the raw edge of the fashion fabric edge is against middle of the welt gap, or "box".  Stitch along the other long edge of the welt "box". Marked with the white thread on the lower of the pockets in this picture)
Slash open the welt to within 1.5cm of the short edges of the "box", and from here out to each corner of the "box".  To get nice even welts it's pretty important to be super accurate about this bit.  And also that you are only snipping one layer of fabric, and not cutting into either the welts nor the pocket lining piece!
Pull through the pocket lining piece, and lay it underneath the pocket piece.
Pull the welt edges underneath also, and flip it up so it is sitting up covering up that "box" gap, like a postal flap.
Pull under the little triangular wedges at each short side of the "box".  For a regular welt pocket the next step would be to just sew the final edge of the triangle down to the pocket lining right above where my finger is pointing... but there are a few more steps to finish this particular pocket...
Because this is a shirt/jacket for a teenager, I opted to topstitch around the welt.  Just remember to flip the pocket lining up and out of the way when you topstitch the attached edge of the welt, so you don't sew the pocket closed by mistake!
That is the welt part of the pocket finished!
Now for the patch part of the pocket...
Trim away any excess fabric from the pocket lining to fit the pocket piece. 
Trim away the fashion fabric portion of the pocket lining to fall within the seam allowances of the pocket piece.  This is just to avoid too many bulky layers in the seam allowances of the patch pocket.  Finish the upper edge of the pocket, fold and press it to the inside,and stitch down in place.
Fold in the seam allowances of the remaining three edges of the pocket to the back, measured to fit the pocket flaps you made earlier, and press and pin in place.  The pocket on the right is flipped over, showing how the fashion fabric has been trimmed to fit within the seam allowances.  See how the welt pocket is all contained and enclosed in itself, and will be a separate pocket from the patch pocket?  Kinda nifty, no?
Sew the patch pockets on to the front of the shirt/jacket, and sew the flaps in place over the top edge. 
Hammer a snap in place on the pocket flap and pocket; et voila!  Two pockets; per pocket!!

Monday, May 16, 2011

Fishing lure jewellery

I did take a few photos while I was making the fishing lure jewellery for last weekend's ball, and I hope this is inspirational and instructive if anyone else wishes to do the same sort of thing.  This is jewellery making, made easy!
Firstly, fishing stores and suppliers!
Well worth a visit!  Who knew they could be stocked with such wonderful and beautiful things??  Since my immediate family is not hugely fishing-oriented, I have not had the opportunity to closely inspect the great beauty and variety of fishing lures available.  Fishing lures are an art unto themselves, and deserve to be shown off more!  In our local fishing store I was spoilt for choice and it was very difficult to narrow it down to just one kind of lure to go with my dress.  In the end I chose iridescent blue fishies; one large and two matching small ones, the same colour as the bright blue fishing net that I had.
To make your own earrings, you will need a couple of earring loops; because I didn't actually have any I took apart another pair of earrings to get these.  Hmmm, will have to stock up on another packet next time I go to Spotlight...  And to make the necklace I used two split rings, a lobster claw catch with loop, a bit of fishing cord, harvested from some bits that came with my net, and some 32 gauge jewellery wire.  
Fishing lures are equipped with some vicious barbs, so the very first thing to do is to cut those off!!  Use heavy duty wire cutters...  otherwise you will be "caught" just like a hapless fish, and if you have ever been unfortunate enough to get up close and personal with a fish hook on a fun family day out fishing you will know that getting those things out is not fun.  If the wire ends are still a bit sharp after cutting off those barbs, you can file them down a bit using a metal file, and bend them in further in a tighter curl, as I did.  You do not want to be snagged on your own jewellery when you are supposed to be looking glamorous now...
Because fishing lures usually come with their own handy rings attached, I simply hooked the smaller lures directly onto the earring loops.  Voila, earrings finished!
For the necklace I threaded a few strands of fishing cord through the loop of the larger lure, and tied it in a knot to keep it stationary and in place.
I attached a split ring onto each of the necklace catch findings, truly the most difficult part of the whole operation.  Split rings are fiddly!
Then threaded the cords through the split rings and measured on my neck to get the lure hanging at just the right length that I wanted.  Then tied the cord in a knot over the split ring to keep it at that length, and did a quick check that each side was the same length.
Then I cut off the loose ends of cord; not too much, because fishing cord has that stiff frictionless quality that will "un-knot" itself very easily.  You want to keep a few centimetres length just to keep the knot nice and stable. 
 The I took the fine-gauge jewellery wire (yes, I wish I had had some gold coloured wire!) and closely wrapped up the lower end of the knot and down the length of the loose ends of the cord.  I made this wrapping as close, tight and as firm as I could.  When you are satisfied that those cords ends are as mummified as possible, snip off the wire and tuck or fold the end down smooth.
Finished!  And it was funny how many people were fascinated by my jewellery that night, and came up for a closer look.  If I say so myself, almost as effective as the diamonds and pearls in the room?

Thursday, April 14, 2011

Cargo pockets, and a lovely surprise

When I went to my letterbox yesterday inside was a most delightful surprise, this wonderful pattern from Gail of My Fabrication.  Pure class and elegance, no?  Thank you so much Gail!!  I already know exactly what I am going to make out of this one, and am pretty excited to give it a try.  But first...
Thank you so much everybody who commented yesterday, with such kind words expressing touching faith in my ability to not make a complete and utter hash of my Japanese fabric; I will endeavour to sew up to those expectations.  Not that there is any more or less pressure or anything, hehe.  The lighter caramel side has a landslide of admirers, and it is therefore fortuitous that my own preferences have been swaying more and more in that direction too.  But before hacking merrily away into that wool and silk gorgeousness that I carted for thousands of kilometres over land, rail and sea all the way home from the land of the rising sun (see, no pressure...) I am going to take a short sartorial breather...
A few quick and satisfying projects are now just what the doctor ordered, after a week of couture stuff.  I have an immediate need for a pair of hiking pants.  The cargoes I was wearing last year have gone into my refashioning-possibly-charity-bin pile. The few photos I have of myself in those things were pretty eye-openingly awful, and incidentally I am now horrified that I actually put some photos on the blog here, yikes!  Now I look back on some of those earlier photos and shudder, toy with vague ideas of deleting some of the more unflattering shots.  But the blog is a journey, and the progression has been an honest one.  Keeping a sometime personal style diary has done wonders for my natural tendency towards dag-dom.  I am a lot more careful how I look now before I sally forth on my daily adventures.  We all heartily agree that appearances aren't everything, right?, only because we don't want to appear shallow, but secretly we all want to put our best foot forward nonetheless... because we are human after all.
Anyhoo, I am making my new, hopefully cute, hiking pants using a pattern that doesn't have enough pockets, so I am adding some cargo pockets and took a few progress shots to illustrate...
Cargo pockets are not just squares/rectangles, but must form a little "bag", so start with a piece that has box sides to three of its edges like so (don't worry that those sides of those sticky-outy box edges are wider than the bottom box edge... minor detail)
Hem the top edge of the pocket like normal...
Sew up the two short edges of the boxy sides at the bottom of the pocket piece (yes, my side pieces are still longer and do stick out a bit, don't worry about this for now)
Right sides together, and upside down on the finished outside leg seam of your pants, sew the bottom edge of the pocket in place.  Because I want these pockets to be extra sturdy, strong enough to hold things like guide books, cameras, hats and sunnies, etc, anything that will be needed regularly, I sewed this seam in triplicate, for triple the strength.  Strength is more important than beauty here, remember these are hiking pants...
Now flip the pocket piece up and turn in those side edge seam allowances.   Now I folded in that extra width of the side edges at the bottom to be part of the seam allowance and tapered this down at the top so the box sides of the bag are wider at the top than they are at the bottom...  If this doesn't make a lot of sense don't worry too much about this bit.  Dimensions are not really drastically important.  These are hiking pants, remember...   Topstitch down close to the fold.  Again with the triple lot of stitching. The width at the top edge of the pocket between the two side seams you've just sewn should be the same width as the bottom seam.
Now, flatten the pocket down at the top and sew the top down vertically through all layers directly over the side seams you have just sewn, but just for a few cm.  Do this at least in triplicate again.  I just did a mad burst of forward and reverse stitching and lost count of the number of seams here, this just needs to be real sturdy.  This will just hold the top edge down securely and stop it from flapping about and letting your treasures spill out while you are walking...
Flaps; just sewn as normal, two pieces, right sides together, sewn around three edges, turned out and topstitched, finished width about 1.5cm wider than the top edge of your pocket...  Note the violation of couture tailoring here, no tamed seam allowances but the corners have been trimmed, (horrified gasp!)  Meh... hiking pants...!
And sewn to the pants just above the top of the pocket.... right sides together, again as normal...
Aaaand folded down and topstitched in place... I don't know why I took so many photos actually.  This is hardly rocket science.  Probably would have been more exciting if I had tamed those seam allowances, hmmm?
And there it is, a useful and cute little bag stuck on the side of the hiking pants.  If you want you could put a snap or a button on for extra safe-keeping, but in my experience these don't ever get closed up anyway and the flap is enough to keep things safely inside.  I'm sure I will be really grateful for these extra pockets out on the trail.